Since July 6, 2023, Atlassian has no longer been used for Release Notes or knowledge base articles.
* Find Release Notes here (https://support.mycontactcenter.net/app/articles/detail/a_id/23378/) and articles here (https://support.mycontactcenter.net/app/main).
* Authenticated Partners can access content here (https://support.mycontactcenter.net/cc/sso/authenticator/oauth/authorize/imcontrolpanel?redirect=main&source=mycontactcenter)
Voice Acknowledgement
- Karla Melendez
The Voice Acknowledgement page is where you can define how your contacts should respond to voice messages sent by your campaign, or what actions the system should take when the contact makes an unexpected telephone keypad response. In addition, the configuration options defined in this page let you:
- Decide if a voice contact is a success or a failure by acknowledging or not acknowledging the responses.
- Capture acknowledgement digits, which are noted in a campaign contacts export.
Once you have created a campaign, you can configure the Voice Acknowledgment flow for the Voice message received by the contact.
Note
You can only select the Voice Acknowledgement Settings until after you have created and saved a new campaign. The example below is an image of a campaign that was created and saved. For more information on creating new Voice Campaigns, see Voice Tab.
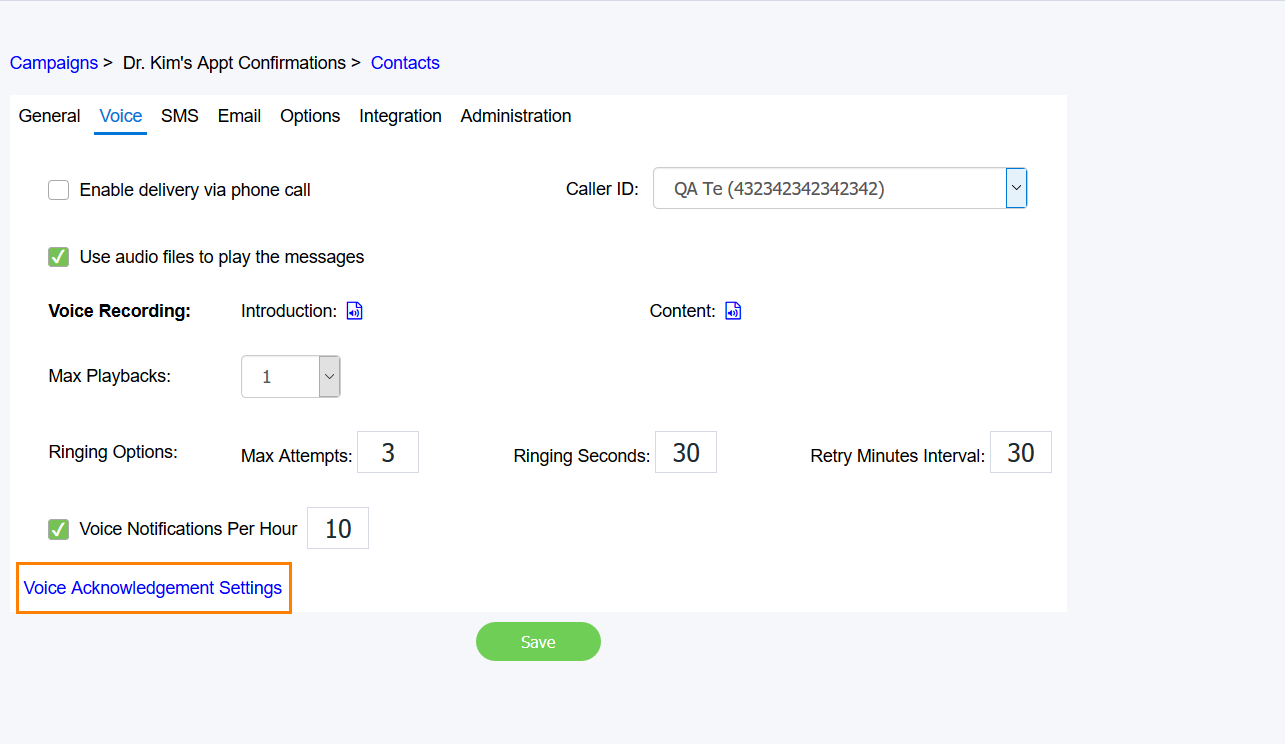
You can set up a different follow-up messaging and subsequent actions for each key on the telephone keypad that the contact can press as an acknowledgement to the campaign's initial or response follow-up messaging. We recommend pre-planning the way in which the campaign's voice notification contacts should flow before making configuration options here. In other words, consider how the notification will sound to the contact during the initial messaging, the follow-up messaging, the action subsequent to the follow-up messaging, replays and retries, and acknowledgement or non-acknowledgement. In addition, consider the desired outcome for contacts status as it relates to "Success" or "Permanent failure".
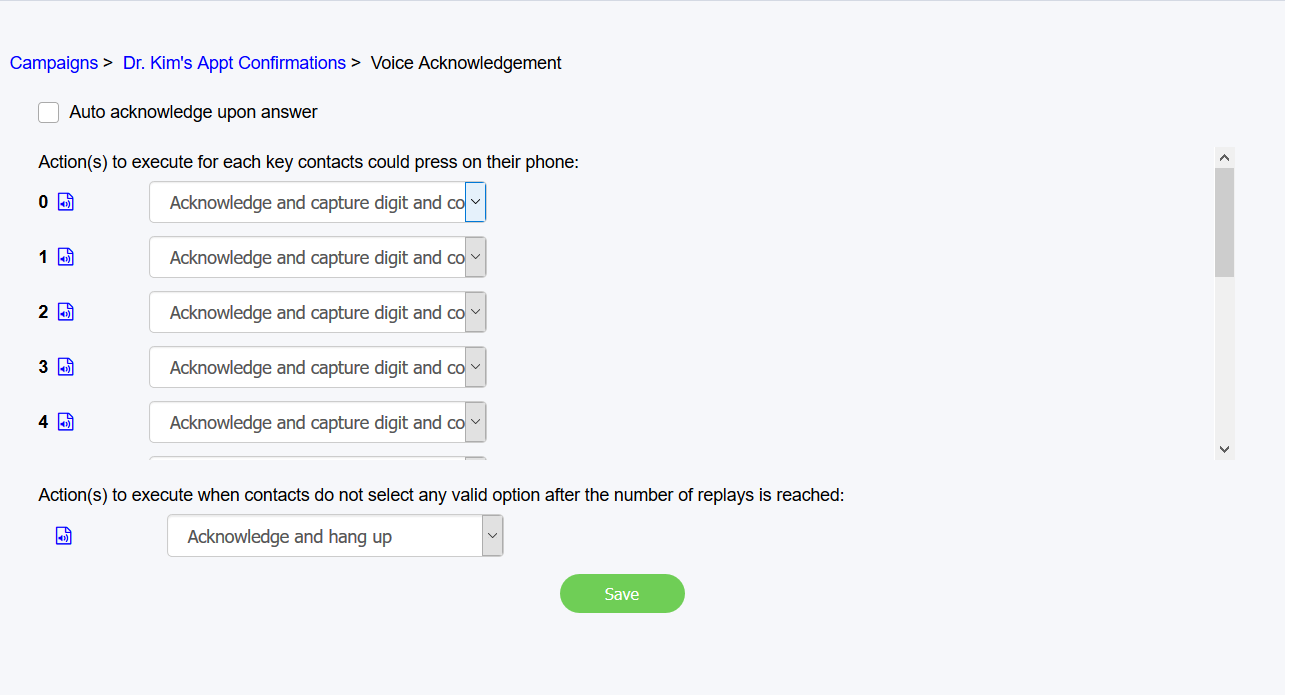
When this page appears, all the buttons that a caller can press are listed (i.e., all the digits from 0-9, the ampersand, and the pound sign). You can assign an audio file to each digit or symbol, and the action to take in response to the button pressed.
Note
If you do not assign an audio file, the action indicated for the button is executed without playing a recording.
To set up the Voice Acknowledgement, do the following for each button option:
- Click the Audio file icon to assign an audio file. The Upload Voice File dialog box appears.
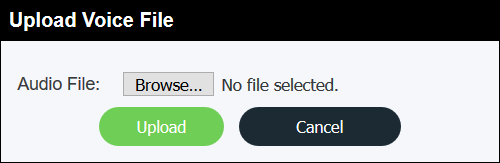
- Click Browse to locate the audio file you want to attach to the button as response.
- Click Upload to upload the file.
- Click the action you want to occur after playing the audio file. The options are as follows:

- Ignore digit, then continue:This does NOT mark the response as an acknowledgement, but ignores the digit. The original message is replayed IF the defined number of replays as configured in the Voice tab is not exhausted. If the configured replays are exhausted, the next step is Action(s) to execute when contacts do not select any valid option after the number of replays is reached.
- Acknowledge and capture digit and continue: The campaign contact captures the digit pressed as the Acknowledgement digit, and then the contact is set to Success status. The campaign terminates the call after a short timeout.
- Hang up: The campaign does NOT mark the response as an acknowledgement, and then hangs up on the caller. If there are retries configured in the Voice tab, the contact is placed into Waiting to retry status. If there are no retries configured, or the number of retries is exhausted, the contact is placed into Permanent failure status.
- Acknowledge and capture digit and hang up: This option provides the same result as Acknowledge and capture digit and continue, but the call is terminated immediately after the selected audio file (if any) has been played. The contact is placed into Success status.
- Connect: The response IS NOT marked as an acknowledgement, and the contact is connected to the indicated IVR. For example, an IVR might exist that has been configured to connect outbound campaign contacts to an agent for help in the event of a repeated invalid response. A second list appears to indicate the IVR to connect the contact to.

Because the contact has been brought to the contact center (either to an automated IVR or to an Agent) for resolution to the invalid response, and in order to reduce annoyance to the contact, the campaign ignores any configured or non-exhausted retries and places the contact in Permanent failure status. - Acknowledge and capture digit and connect: The response is captured as an acknowledgement digit, and then the contact status is set to Success. The contact is then connected to the configured IVR as noted in the Connect option above.

- Transfer: The response is not marked as an acknowledgement, and then the contact is transferred to a telephone number. For example, you might have a telephone number to a separate service dedicated to bringing outbound campaign contacts to a representative for help in the event of a repeated invalid response. A second list appears to indicate the telephone number to transfer the contact to.

Because the contact has been transferred to a telephone number for resolution to the invalid response, and in order to reduce annoyance to the contact, the campaign ignores any configured or non-exhausted retries and places the contact in Permanent failure status. - Acknowledge and capture digit and transfer:The response is captured as an acknowledgement digit, and then the contact status is set to Success. The contact is then transferred to the telephone number as noted in the Transfer option.

- Configure the following options for cases where the contact does not make a valid response:
FMI: This option is executed only after any replays configured in the man Voice Campaign tab. For more information, see Voice Tab.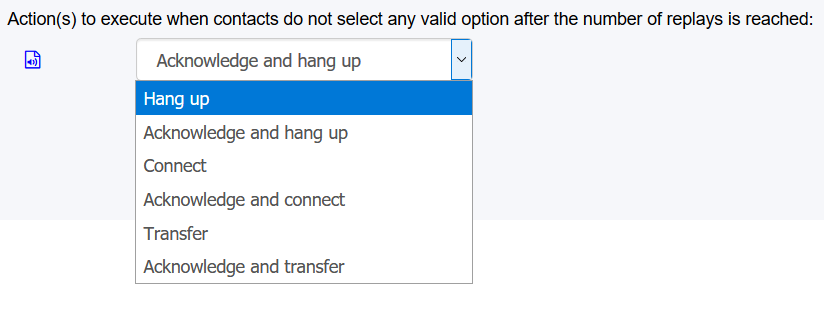
- Click the Audio file icon to assign an audio file. The Upload Voice File dialog box appears.
- Click Browse to locate the audio file you want to attach to the button as response.
- Click Upload to upload the file.
- Click the action you want to occur after playing the audio file. The options are as follows:
- Hang up: Disconnects the call and performs no other action.
- Acknowledge and hang up: The response is marked as an acknowledgement, and the call is disconnected.
- Connect: The response IS NOT marked as an acknowledgement, and the contact is connected to the indicated IVR.

- Acknowledge and connect: The response is marked as an acknowledgement, and the contact is connected to the indicated IVR.

- Transfer: The response IS NOT marked as an acknowledgment, and the contact is transferred to the indicated telephone number.

- Acknowledge and transfer: The response is marked as an acknowledgment, and the contact is transferred to the indicated telephone number.

- Click the Audio file icon to assign an audio file. The Upload Voice File dialog box appears.
EXAMPLE
If you are running a voice campaign that delivers appointment reminders to contacts, you might give your contacts the options to press 1 to confirm the appointment or press 2 to cancel the appointment. Finally, if the contact fails to press any of the given options and the Max Replays have been exhausted, you might set up what should happen to the call if no valid option has been made. Using those options, your Voice Acknowledgement page might look like this:
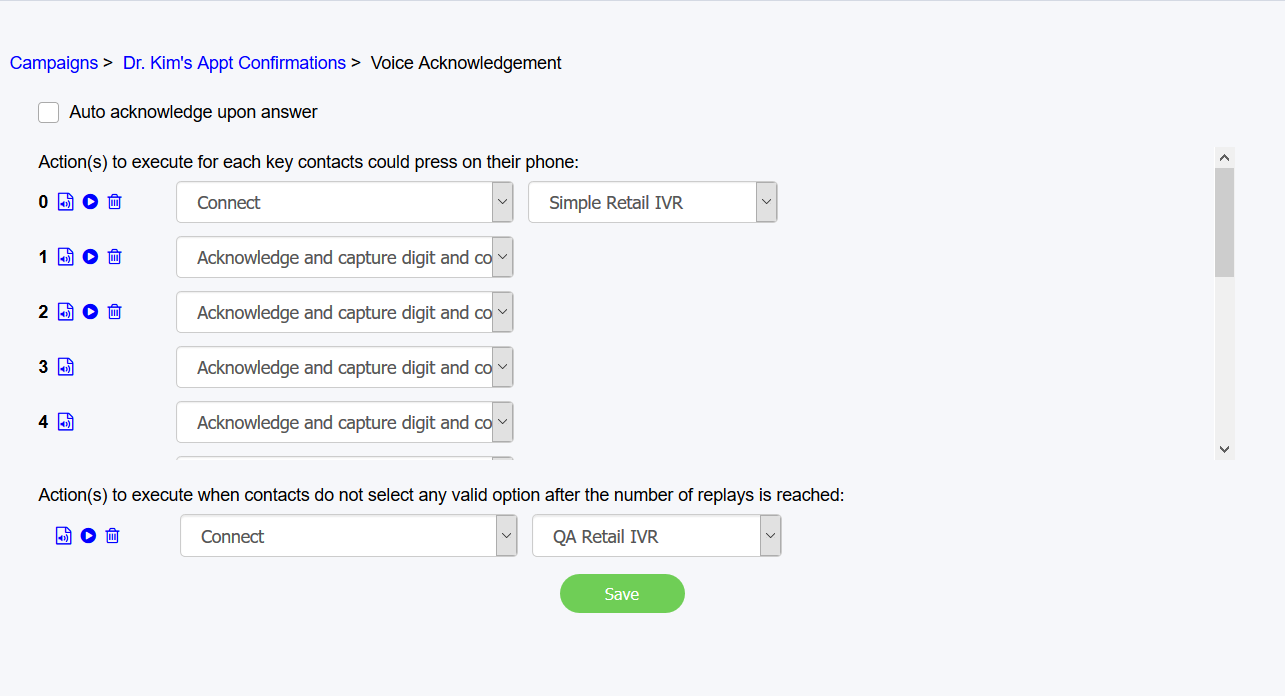
- If the contact presses 0, the status is set to Permanent Failure, and then the contact is connected to an IVR to be taken to an agent.
- If the contact presses 1, the appointment confirmed message is spoken, and the acknowledgement digit is captured. The contact is set to Success status.
- If the contact presses 2, the appointment cancellation message is spoken, and the acknowledgement digit is captured. The contact is set to Success status.
- If the contact presses any other option, the invalid response message is spoken and no acknowledgement digit is captured. The contact is set to Permanent failure status, and then:
- If there is a replay configured, the original message is played.
- If there are no replays configured or if the replays have been exhausted, the Actions to execute when contacts do not select any valid option after the number of replays is reached message is played (e.g., "Please hold while we connect you"), and then the contact is connected to the configured IVR and taken to an Agent.
Important
We recommend configuring a response for each key in order to ensure a smooth call treatment, and to make the call treatment sound more natural to the contact.
VERY Important
Connect options send contacts to your selected IVR. We highly recommend naming the IVRs and associated queues named in such a manner as to accept calls from any campaign, but for the same purpose (e.g., Cancellations or Confirmations). This way, the Agent knows what the purpose of the connection to them is for without having to ask the contact. In addition, with the desktop Call Center Agent version 11.8 and above, the name of the campaign that the contact was reached from AND the full name of the contact is automatically presented to the Agent, thus ensuring that the Agent knows who the contact is.
Related content
Since July 6, 2023, Atlassian has no longer been used for Release Notes or knowledge base articles.
* Find Release Notes here (https://support.mycontactcenter.net/app/articles/detail/a_id/23378/) and articles here (https://support.mycontactcenter.net/app/main).
* Authenticated Partners can access content here (https://support.mycontactcenter.net/cc/sso/authenticator/oauth/authorize/imcontrolpanel?redirect=main&source=mycontactcenter)