Since July 6, 2023, Atlassian has no longer been used for Release Notes or knowledge base articles.
* Find Release Notes here (https://support.mycontactcenter.net/app/articles/detail/a_id/23378/) and articles here (https://support.mycontactcenter.net/app/main).
* Authenticated Partners can access content here (https://support.mycontactcenter.net/cc/sso/authenticator/oauth/authorize/imcontrolpanel?redirect=main&source=mycontactcenter)
Email Routing
Inbound Email queues provide an alternative channel for patrons to reach your contact center. Similar to voice and chat queues, emails arrive and wait in a queue for agents to become available. A suspend feature has been added which allows an agent to park or suspend a received email, and return to it at a later date.
Navigate to the Email Routing screen within the Administrator Portal to manage and create rules for routing inbound emails.
Use the Default Queue drop down menu at the top to select an available email queue to serve as the default queue. Since email addresses and queues may have a one-too-many relationship, a default queue must be defined to prevent any loss of emails. Use the Default Auto Reply Template drop down menu to select an auto reply template to send out to customers in absence of any other defined rule.
Note: The options that will appear in the Default Auto Reply Template drop down menu will be templates that you created as that template type. See Creating a Template for further information.
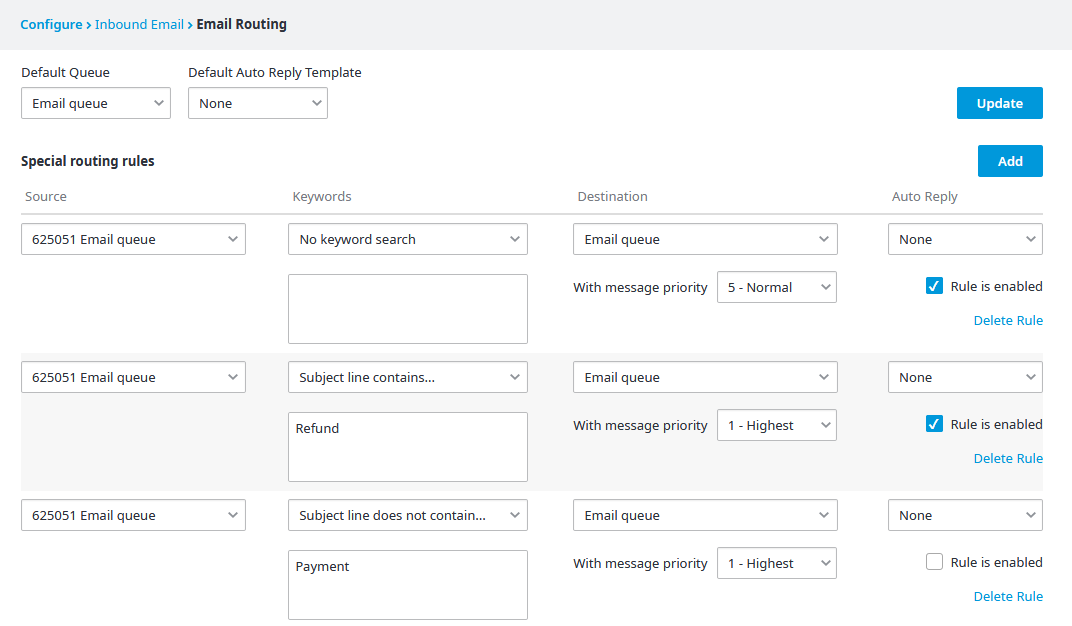
Note: All incoming emails will be routed to the default queue unless a rule is created that specifies otherwise.
To create a rule:
- Click Add.
- A New Rule window opens.
- Fill out the form to create your rule.
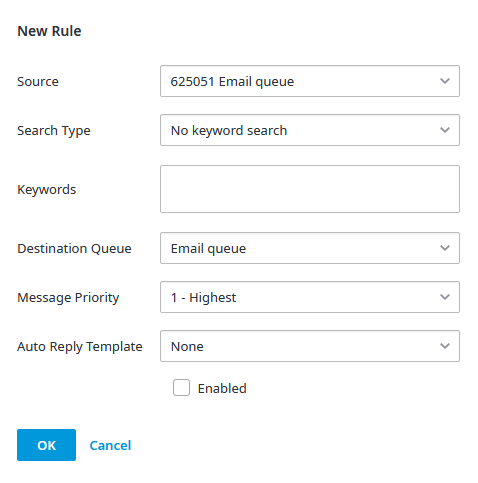
Source – Select the originating queue the emails are to be routed from.
Search Type – Choose the appropriate search type for your rule, a rule with 'no keyword search' ensures that all emails from the source will go to the specified destination. You may select from the following options:
- No keyword search (rule will be applied to all emails from the source)
- Subject line contains…
- Subject line does not contain…
- Body message contains…
- Body message does not contain…
Keywords – Enter a word or string of words to search for, only a match of the entire string entered will trigger the re-route (not a Boolean OR). Do not use wildcards like "{}{*}".
Destination Queue – Select the queue where the emails should be routed to.
Message Priority – Select a priority for the routed emails; a high priority such as '1' (highest) will ensure the routed emails take precedence over other lower priority emails.
Auto Reply Template – Select an auto reply template to use to send responses to customers.
Enabled – Place a checkmark here to turn the rule on.

4. Once you are finished creating the rule, click OK and your rule will be added.
5. When an email arrives, the system will go through all the rules in the order in which they are created (listed top-down). If no rule is found for an email, it will be routed to the default queue.
Note: Rules may be changed, disabled, or deleted, but not re-ordered.
Since July 6, 2023, Atlassian has no longer been used for Release Notes or knowledge base articles.
* Find Release Notes here (https://support.mycontactcenter.net/app/articles/detail/a_id/23378/) and articles here (https://support.mycontactcenter.net/app/main).
* Authenticated Partners can access content here (https://support.mycontactcenter.net/cc/sso/authenticator/oauth/authorize/imcontrolpanel?redirect=main&source=mycontactcenter)