To access the General settings, navigate to Configuration > General > Global Settings and click the General tab. Here you can define your contact center's system-wide settings, which can be adjusted at any time.
Complete the following General fields:
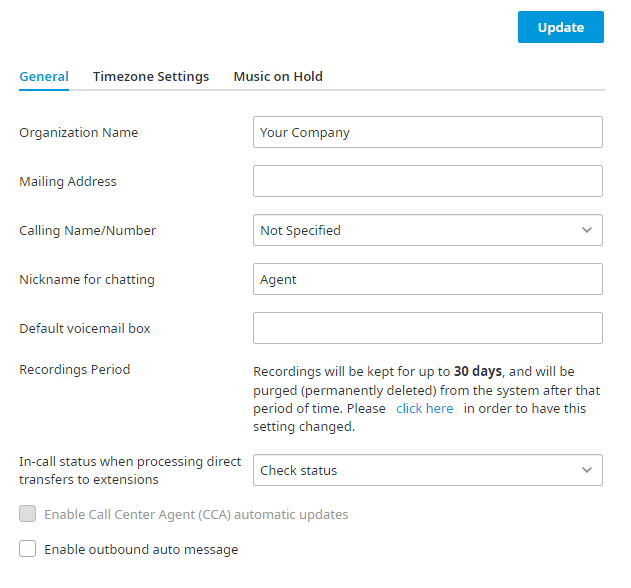
- Organization Name − Enter the name of your company or organization as it should be reflected in the page headers of several reports.
- Mailing Address − Enter the mailing address of your company or organization as it should be reflected in the page headers of several reports.
- Calling Name and Calling Number − Used for caller ID information when a representative places an outbound call (the name and number that will be seen on the receiving end's call display). You may also add a calling name and number for every team on the Agents page. Representatives will then have a choice of which name and number to select as their caller ID information when dialing out.
- Calling Name − Enter a maximum of sixteen characters, do not use any of the following symbols: \:@/"
- Calling Number − Enter a maximum of ten digits (no letters or symbols).
- Nickname for chatting − Enter a nickname here if all agents responding to online chat requests should appear with the same name. You may also define a unique nickname for each individual on the Agents page.
- Default voicemail box − Enter an email address or addresses that will receive captured voicemails. Multiple email addresses should be separated by a comma (,) or semicolon (;). Voicemail is recorded and sent out as attachments within an email. For every voicemail captured, one email will be sent with one WAV file attached. WAV files are recognized by most audio players. This setting is applicable if your IVR design has After Hours or Holiday messaging before a caller can select a specific queue. Voicemail associated to a specific queue will be sent to the voicemail box configured for that queue. See Queues for information on configuring voicemail for each queue.
- Recordings Period − Recordings are kept for up to 30 days by default, upon which they are permanently deleted from the system after that period of time. Recording retention periods may be optionally increased with subscriptions to extended recordings time. To change the duration recordings are kept, click the click here link located beside Recording Period to contact your Service Provider to request the change. (Additional fees may apply)
- Bring Your Own Cloud Storage − Optionally, you MAY also provide your own Cloud Storage for call recordings and have the retention periods adjusted to any time interval (note - Please contact your Service provider to have this adjusted if desired even if you are bringing your own cloud storage) without the need for recording retention period subscription increases. This capability is currently compatible with Amazon S3 and Microsoft Azure Blob storage "Hot" services in any region globally where those services are available.
- Required Information − In order to have your account configured to push recordings to your own Cloud Storage service, please contact your service provider and be able to provide:
- Bring Your Own Cloud Storage − Optionally, you MAY also provide your own Cloud Storage for call recordings and have the retention periods adjusted to any time interval (note - Please contact your Service provider to have this adjusted if desired even if you are bringing your own cloud storage) without the need for recording retention period subscription increases. This capability is currently compatible with Amazon S3 and Microsoft Azure Blob storage "Hot" services in any region globally where those services are available.
- For Amazon S3:
Region Name, Access Key, Access Secret & Bucket Name- Example:
Region Name: “us-east-1”
Access Key: “BTKBKLPGCXEJABCDE1YZ”
Access Secret: “7fVH1ByFNbcDasT1kwYU/j5wa7YlMKL8XOL4mH79a0SRHT9Bm5QBxgMCeX6Rr1ZGjusW/NJYuUh60mM59yxPe==”
Bucket Name: “monstersinc-recordings”
- Go here for details related to setting up your Amazon S3 Storage Bucket
- For Microsoft Azure Blob:
Account Name, Account Key, Container Name
- For Amazon S3:
Example:
Account Name: “monstersinc”
Account Key: “7fVH1ByFNbcDasT1kwYU/j5wa7YlMKL8XOL4mH79a0SRHT9Bm5QBxgMCeX6Rr1ZGjusW/NJYuUh60mM59yxPe==”
Container Name: “recordings”
Go here for details related to setting up your Microsoft Azure Blob Storage Container
- Server-Side Encryption - If you are providing or would like to provide your own Cloud Storage account, it is recommended that you enable server-side encryption on your Cloud Storage Service. Both Amazon S3 and Microsoft Azure Blob storage services also offer "server-side encryption" which will keep your recordings files secure while stored in these services. With Server Side Encryption only, once downloaded from either service by an authenticated user, the Call Recording file will be decrypted and listenable.
See notes on Amazon S3 Server Side Encryption here: http://docs.aws.amazon.com/AmazonS3/latest/dev/serv-side-encryption.html
See notes on Microsoft Azure Blob Storage Server Side encryption here: https://docs.microsoft.com/en-us/azure/storage/storage-service-encryption - Client-Side Encryption - By default, the Cloud Contact Center service also performs "Client-Side Encryption". With Client-Side Encryption enabled, Call Recordings will only be listenable when accessed via the Cloud Contact Center Admin Portal Recordings search.
The recordings will not be listenable when downloaded from your cloud storage account directly or by any other service you build that accesses these files unless Client-Side Encryption is turned off. To disable Client-Side Encryption, Please contact your Service provider. Verify in-call status when processing direct transfers to extensions – Choose the option here to force the system to verify the in-call status of a user when processing direct transfers to extensions. When enabled, if a user is on break, direct transfers to their extensions will be automatically declined.

FMI
When using Blind Transfer with Dial by Extension, you need to set the In-call status when processing direct transfer to extension to Don’t check status. If the status is set to Check Status or Check Status with agent options, the Blind Transfer after the Dial by Extension will disconnect the caller with no warning if the agent is not in Available status. For more information about Blind Transfers, see Transfer Call to a Phone Number (Third Party).
- Enable Call Center Agent (CCA) automatic updates - Place a checkmark here to automatically update your Call Center Agent (CCA) software when a new version becomes available. Leave the checkbox unchecked to manually update the CCA software.
- Enable outbound auto message - Place a checkmark here to enable Outbound Auto Messaging in the Call Center Agent (CCA). Once enabled, the Outbound Messaging IVR menu option becomes visible in the CCA and the Agent is able to start recording and sending out pre-recorded outbound messages to customers. If the checkmark is unchecked Outbound Auto Messaging is disabled, and the menu option Outbound Messaging IVR will not be available in the CCA.