Introducing, The dynamic notification tool endpoints will be modified to support these special characters in the text field:
^ ( ) [ ] - _ + ? , = ; : / @ . & $ *` ~ # % { } | < >
When
May 18: USA West, Canada
May 19: USA East, Rogers
Highlights
API users will be able to send values that contain the special chars listed in the introduction, to the Text fields of the DynotesContacts API endpoints:
VoiceInfo
Text: Text to speak during a voice call (you can leave the field empty)SMSInfo
Text: Text to send in an SMS (you can leave the field empty)EmailInfo
Text: Text to send over email (you can leave the field empty)
The forward slash \ is NOT accepted, and it is read as an invalid text/value.
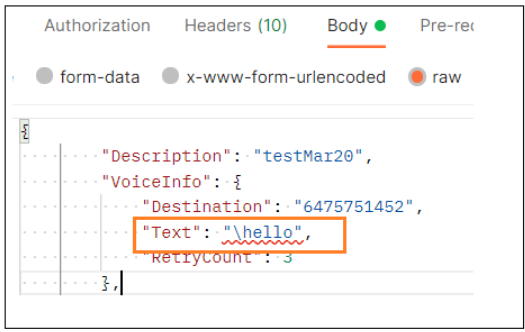
Example of a successful post.
The image below shows four endpoints where the special characters have been applied correctly.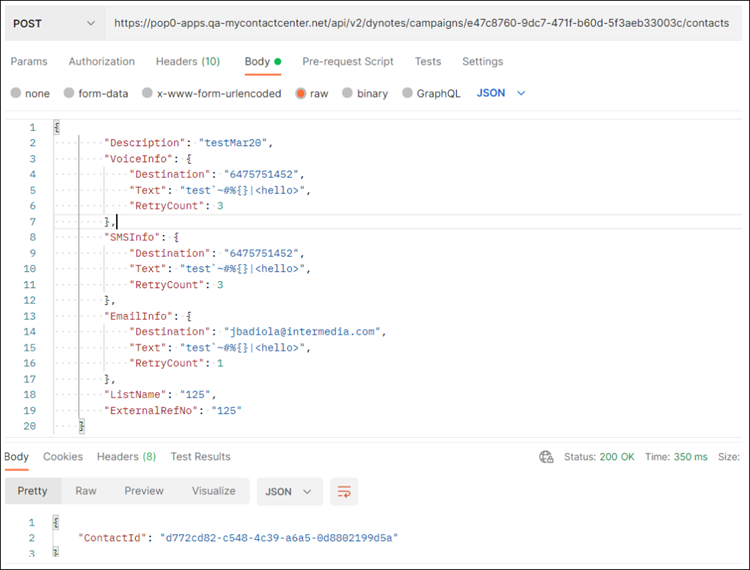
The resulting values are as shown below.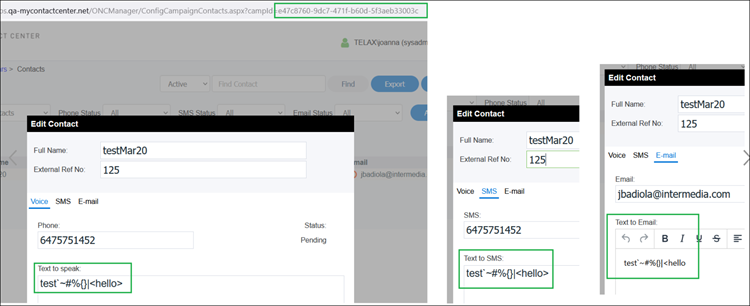
How do I get this feature?
The new feature will be automatically available for use.
No intervention is required from a Service Provider.
Introducing, End-users waiting in queue in a chat will be able to return to the chat interface or ICR that placed them queue.
When
March 23: USA West, Canada
March 24: USA East, Rogers
Highlights
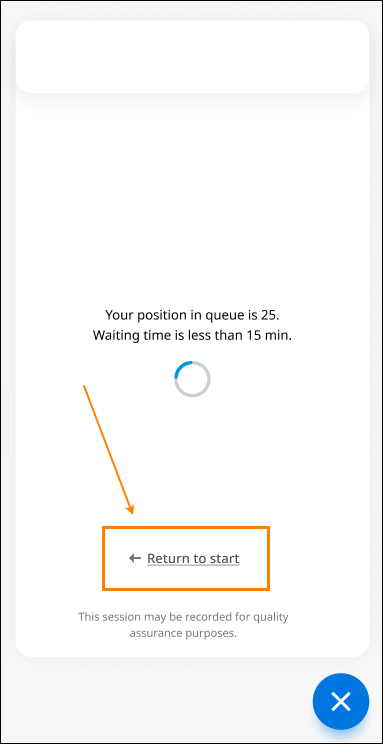
A link will appear at the bottom of chat apps that redirects back to a chat or ICR. When an end-user sees how long they have to wait in queue for an agent, they will be able to click the link and return to the chat queue or ICR that placed them in queue.
Cases when the link will not appear on the chat app:
The queue does not have any other pages, such as data collection or invite. In this case, the end-user is placed directly on queue when they initiate the chat; therefore, there is nothing for the end-user to return to.
Chat mode is reactive with a disabled data collection form.
Chat mode is proactive without an invite form.
Dequeuing: If an administrator sets up a chat scenario where a chat dequeues to another queue, the Return link will appear for both queues. Here are two sample flows for this scenario:
a. End-user opens site with Webchat > End-user is placed in Queue 1 > Dequeues to Queue 2.
b. End-user opens site with ICR > End-user is placed in Queue 1 > Dequeues to Queue 2
In both of these cases, the End-user will see a Return link while in Queue 1 and Queue 2. If they click to return from Queue 2, the End-user will be sent back to the initial Webchat interface for Queue 1 or to the initial ICR page.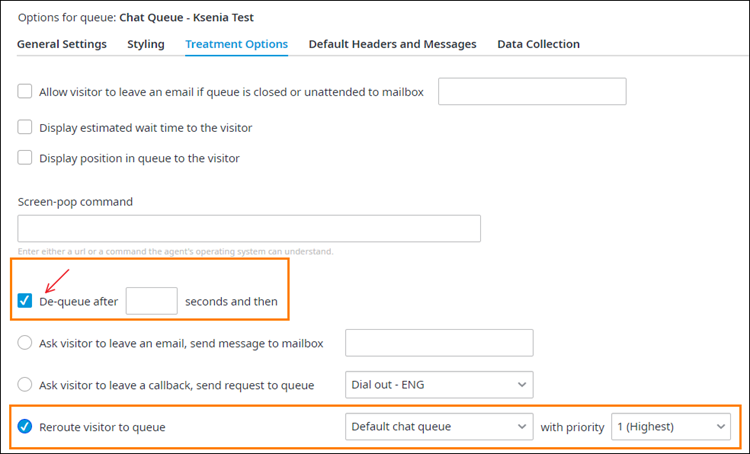
How do I get this feature?
The new feature will be automatically available for use.
No intervention is required from a Service Provider.
Introducing, Two updates are planned for Proactive Interactive Chat Response: culture support and propagation of the configured culture to chat queues redirected from the ICR.
When
March 23: USA West, Canada
March 24: USA East, Rogers
Highlights
Contact Center administrators configuring an ICR can set up a culture for it by adding the culture to the proactive script (this is the Proactive Chat URL from the ICR General Settings tab).
You must modify the script and indicate the culture using the paramLANG attribute, then deploy the script to your website using the <script> html tag.
You must also configure the website to pass the culture parameter via the website URL (for example, by adding a language selector to the website that will pull the selected culture to the URL). The URL parameter MUST be formatted like this:
&lang=de-DE (or other supported culture using the four-letter xx-XX format, for example, en-US)
OR
&lang=fr (or other supported culture using the two-letter xx format, for example, en)The cultures currently supported are: en-US, en-GB, en-AU, de-DE, nl-NL, it-IT, fr-CA, es-LA, ja-JP
If you enter a non-supported culture (for example, ru-RU), the system falls back to the default cultures, which are as follows:
pop1 (Virginia), pop6 (Seattle, WA), pop0 (Canada): English-US (en-US)
pop2 (London & EMEA), pop3 (Australia): English-GB (en-GB)
pop4 (Japan): Currently unavailable. When accounts become active, the fallback language will be Japanese (ja-JP)
Possible exception scenarios:
A Contact Center administrator enters an unsupported dialect, but the parent culture is supported: The system falls back to the parent culture.
For example, a user enters fr-FR as the ICR culture, which is an unsupported dialect. We support French-Canada, and so the system defaults to fr-CA.A Contact Center administrator makes a typo and enters a culture in an unsupported format: For example, ger or ja-j. The system falls back to the default culture of the data center.
For example, a user enters esp as the ICR culture, which is an unsupported format so the system does not recognize it. Assuming the account is an EMEA account, the system defaults to en-GB.
ICR culture propagation to chat queue:
A Contact Center administrator could build an ICR that includes a link or button that redirects to a chat queue. If a culture has been configured for the ICR, the system passes the ICR culture at the queue redirect.
The configured culture defines the language used in the webchat app interface. In other words, messages such as Wait for agent, data collection forms, invite forms, etc., appear to the end user in the language passed by the ICR.
Currently, cultures affect chat queues only when redirected from ICRs. If an ICR does not redirect to a chat queue, cultures will have no effect on the chat queue. This might change in the future, when integration with chat bots is released.
How do I get this feature?
The new feature will be automatically available for use.
No intervention is required from a Service Provider.
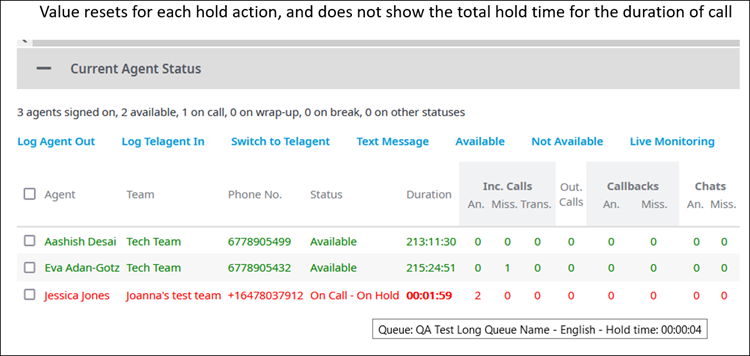
Introducing, Two updates are planned for the Monitoring page: the ability to expand and sort the Agent List, and the ability to see the Hold Time.
When
March 16: USA West, Canada
March 17: USA East, Rogers
Highlights
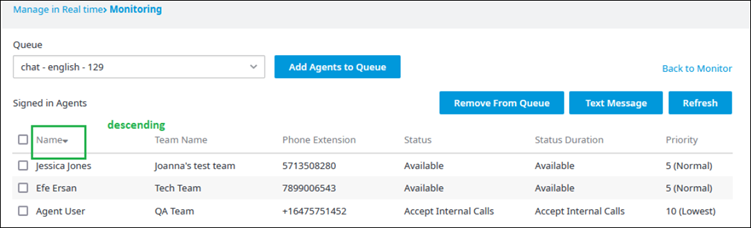
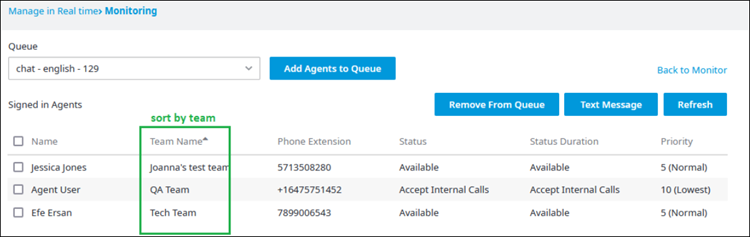
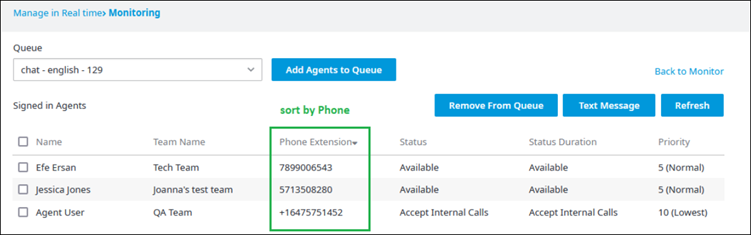
Ability to expand and sort the Manage Queue Agents List
The functionality to paginate and scroll will be removed from the Monitoring page. In exchange, all agents will appear on the page, along with a filtering and sorting tool that will allow Contact Centre Managers and Supervisors to hide unimportant metrics or statuses and focus only on those that warrant attention.

The sorting and filtering options will do the following:
Name: Sort in ascending or descending order

Team Name: Sort by the team name
Phone Extension: Sort by the phone number
Status, Status Duration: Filter by a particular status or status duration
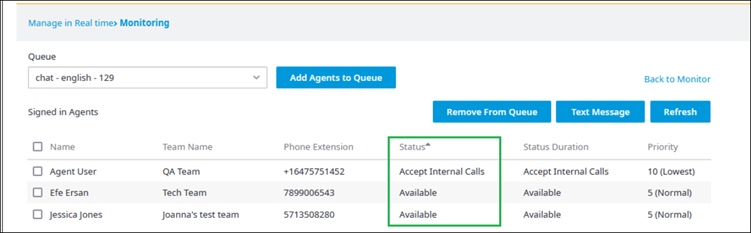
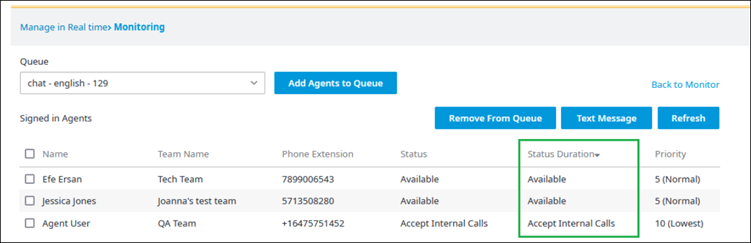
Priority: Filter by a priority 1-10
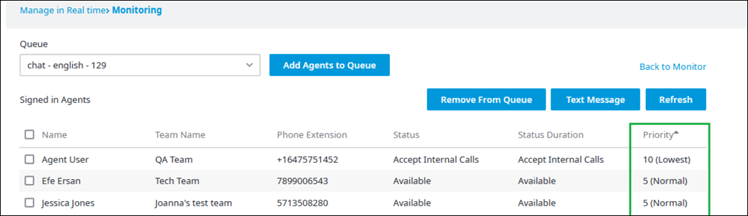
Since a scroll bar will no longer appear on the Monitoring page, users can employ the web browser’s scroll bar to move up or down the page.
Since pagination will be removed, there will no longer be a cap to the number of agents that can appear on the page.
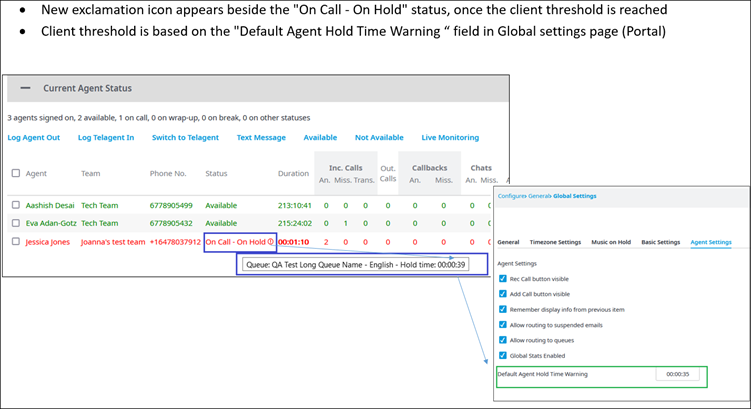
Ability to see the Hold Time
With this feature, Contact Center Managers or Supervisors will be able to monitor how long an agent has had a customer on hold.
When the agent's call status changes to On Call – On Hold, the Manager or Supervisor will be able to hover over that status. A tooltip will display the current hold time for that session.
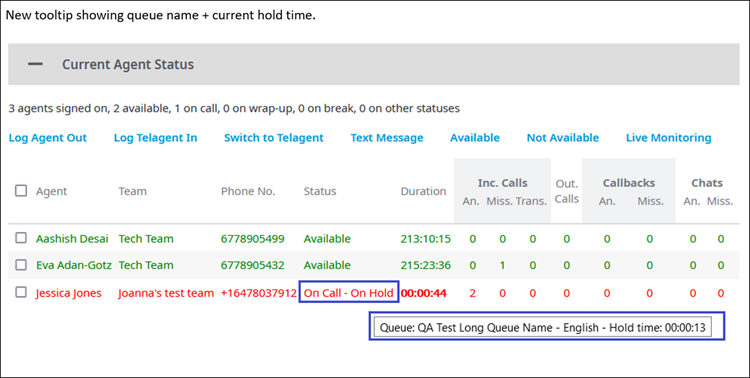
The hold time resets for each hold action and does NOT show the total hold time for the duration of the call.
If the agent exceeds the recommended threshold time to have a customer on hold, the tooltip will show an exclamation icon and the current hold time.
How do I get this feature?
The new feature will be automatically available for use.
No intervention is required from a Service Provider.
Introducing, Whenever an end-user downloads a voice recording file from Contact Center Admin portal, the system generates a file name based on the pattern YYYYMMDD_HHMMSS_[file name], where YYYY is the year, MM is the month, DD is the day, HH is the hour (24-hour clock), MM are the minutes, and SS are the seconds. Currently, the UTC time zone is used to generate the date and time (+UTC is added to the file name). The planned change will use the account's time zone instead, and the time zone abbreviation will be removed from the file name.
When
March 16: USA West, Canada
March 17: USA East, Rogers
Highlights
When an end-user downloads a voice recording using the Voice Recordings page (accessed by navigating to Analysis > Recordings > Voice Recordings), the current file name is similar to the example below:
20220107_212258_UTC_IN_19054814740_Joe Smith_dba8043a-50dd-4b60-90bb-d3af688627a7After the planned change takes effect, the file name will be similar to the example below (assume the account time zone is Eastern Time, or UTC-05:00)
20220107_162258_IN_19054814740_Joe Smith_dba8043a-50dd-4b60-90bb-d3af688627a7
When the end-user searches for voice recordings in Contact Center Admin Portal, the date and time displayed for the call will be according to the user's time zone. However, the file name will show the date and time according to the account's time zone. If the end-user is on a different time zone, there WILL BE a mismatch between the time shown on the Admin Portal and the downloaded file name. Refer to example below.
Account time zone: Eastern Standard Time (UTC-05:00).
User time zone: Pacific Standard Time (UTC-08:00).
When searching for voice recordings, the user will see the Call Date from the Voice Recordings page in PST:

When the user clicks Listen to download the recorded file, the file name will show EST:
20220202_130355_IN_16472771101_Jessica Smith_df7711d7-4924-4529-b76e-826453a6a4c6
How do I get this feature?
The new feature will be automatically available for use.
No intervention is required from a Service Provider.
Introducing, We're providing administrators with the option to choose a time zone for scheduled telagents. By default, new schedules for telagents will propagate the account time zone, but administrators can change it.
When
March 16: USA West, Canada
March 17: USA East, Rogers
Highlights
A new Time Zone drop-down list will appear in a scheduled telagent's page accessed through Configure > General > Scheduled Telagent.
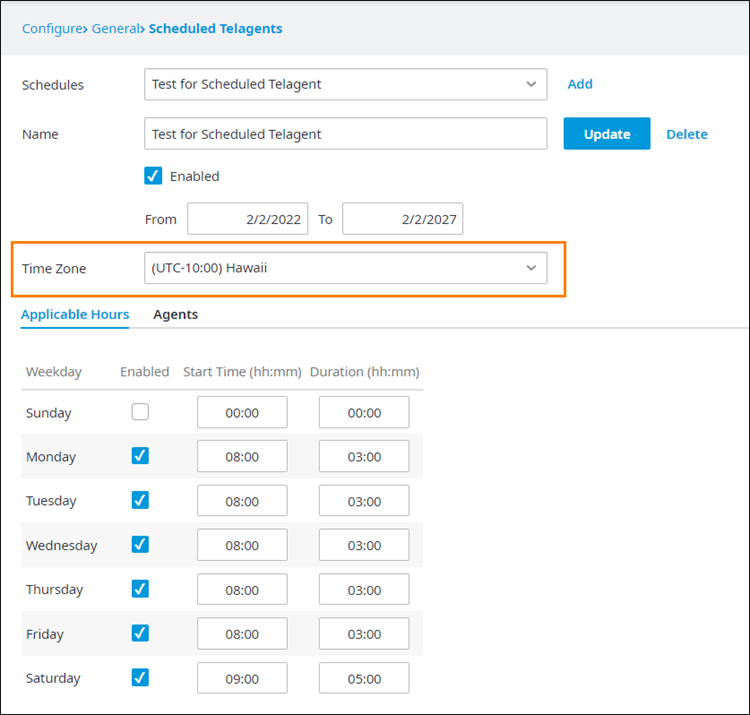
If the administrator changes the time zone and clicks Update, the change applies ONLY to the selected Scheduled Telagent.
If there are multiple scheduled telagents and all will need different time zones, the administrator will need to configure each telagent individually.
How do I get this feature?
The new feature will be automatically available for use.
No intervention is required from a Service Provider.
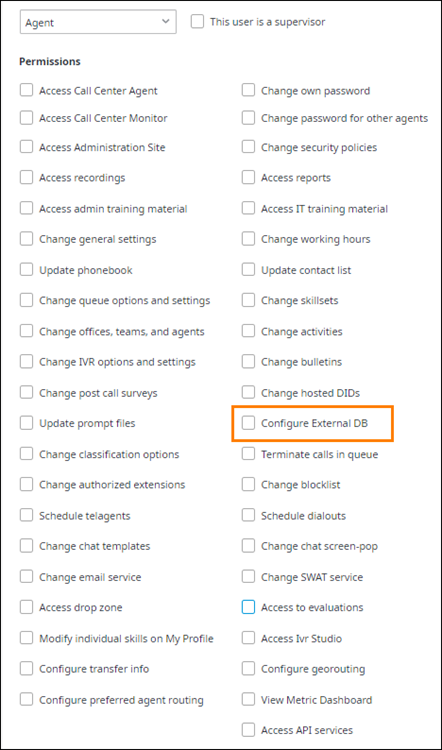
Introducing, We're providing administrators with the option to grant agents access to external databases. Currently, the only way to do this is for agents to have access to IVR Studio, but there are risks associated with such access. To minimize this risk, administrators will be able to give agents access to external databases.
When
March 16: USA West, Canada
March 17: USA East, Rogers
Highlights
A new Configure External DB check box will appear in an agent's configuration page accessed through Configure > General > Agent. More specifically, in the Security tab of the agent's configuration page.
The permissions define access as follows:
Access IVR Studio: The agent can log on to the IVR Studio tool, but CANNOT access external databases.
Configure External DB: The agent can access the page Configure > Inbound Voice > External Data (URL: /admin/ConfigIvrDataTable.aspx) in Contact Center Admin Portal.
Those agents with permissions set to Access IVR Studio at the time of the release of this new feature will AUTOMATICALLY have the new External DB Access permission turned on. This is so agents do not lose access to their external databases upon implementation of the new feature.
New agents or agents with no current permission to Access IVR Studio will, by default, have the permission to External DB Access turned off. Administrators can grant access by setting this permission at a later time.
How do I get this feature?
The new feature will be automatically available for use.
No intervention is required from a Service Provider.
Introducing, Currently, the Contact Center system only allows for bulk archiving of contacts imported via list names. In addition, archiving can only occur if a campaign is in either Paused or Completed status, and the contacts are in Do Not Try or Pending status. The planned changes will allow administrators managing campaigns to archive campaigns in any status, and contacts in any status that is not In Progress.
When
March 09: USA West, Canada
March 10: USA East, Rogers
Highlights
When you edit a campaign and navigate to the campaign's contacts, you will see a new filter for List Names. In addition, the button Archive by List Name will appear as Archive Filtered Results and moved in line with the other filters.
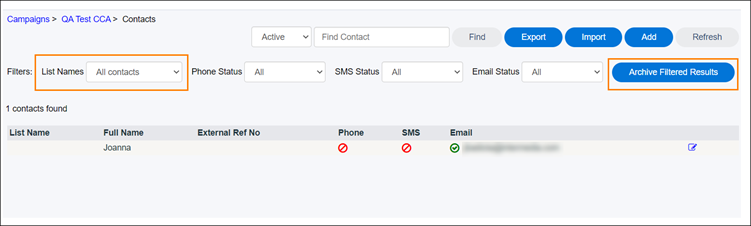
Campaign administrators will be able to apply one or more filters to narrow down the list of contacts to be filtered. If NO filters are applied, all contacts will be archived according to the behavior described in the next points.
Campaign administrators will be able to archive campaigns in any status: Active, Paused, Cancelled, Completed.
Once filtered, campaign administrators will be able to archive contacts in any of these statuses: Disabled, Pending, Success, Waiting for retry, Permanent failure, Cancelled.
The system will NOT archive contacts with a status of In Progress, even if they appear in a filtered list.
It will be possible to archive contacts imported through a list name or individually.
How do I get this feature?
The new feature will be automatically available for use.
No intervention is required from a Service Provider.
Introducing, Currently, the Contact Center system displays an Agent’s First Name and Last Name to a Webchat client user instead of the Agent’s Nickname. The planned change will show the Agent’s nickname instead.
When
March 23: USA West, Canada
March 24: USA East, Rogers
Highlights
The System will display Agent-level Nickname in the Webchat application.
Administrators can find the setting in the Contact Center Admin Portal by navigating to Configure > General > Agents, and scrolling to the Chatting area.
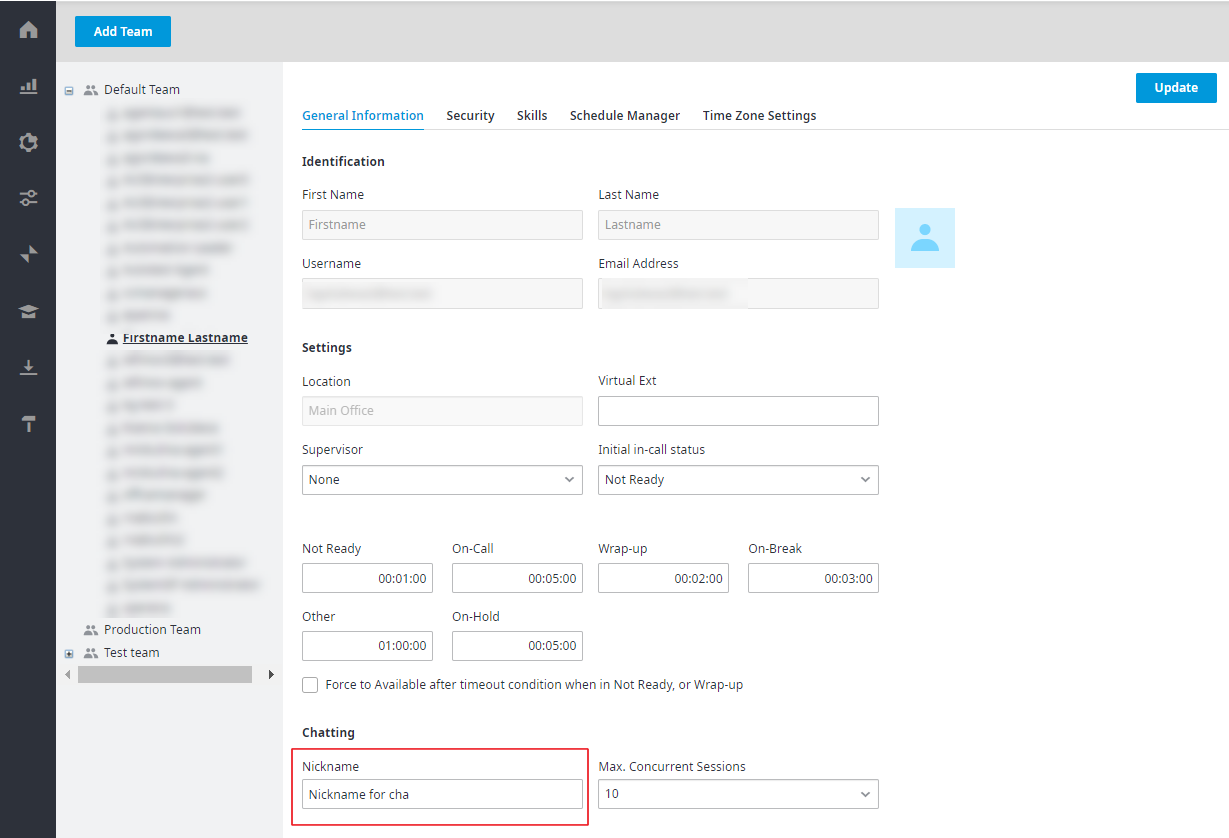
By default, the Nickname box is empty. Only the Agent themselves or the Contact Center Administrator (with sufficient permissions) can modify this setting.
If the Nickname box is empty, the System will display the nickname configured at the account level.
Administrators can find the account level setting in the Contact Center Admin Portal by navigating to Configure > General > Global Settings.
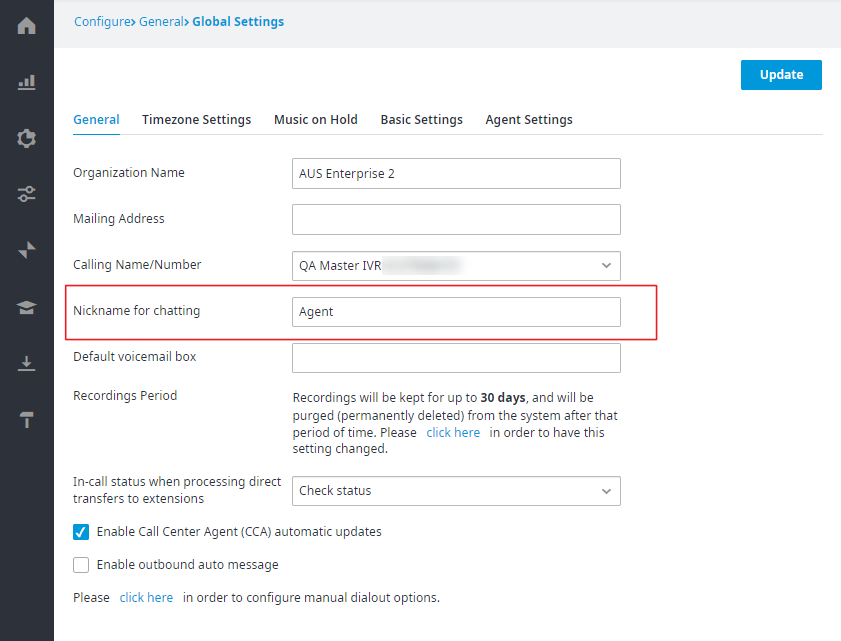
If any of the settings above are empty, the System will use the default nickname Agent, which will be translated into other languages.
The System will decide which culture to use for the default chat nickname based on the chat queue culture.
The Customer will not be able to change the default nicknames for any of the languages.
The default nickname for English and other languages will be listed in a KB article that will be available for Customer information only. The link to the KB article will be added to the Contact Center Admin Portal General Settings page.
How do I get this feature?
The new feature will be automatically available for use.
No intervention is required from a Service Provider.