- Click on the Re-route link corresponding to the email you wish to re-route.

- The Route Email dialog box opens, presenting you with two options.
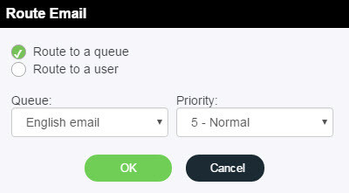
- Choose Route to a queue to send the email back into a queue, you may also assign a new Priority to the email. A high priority such as '1' (highest) will ensure the email takes precedence over other lower priority emails.
- Choose Route to a user to move the email to a different agent's suspended emails. You may also assign a new Due Date for that suspended email. By default, the due date will be one day after the current date.
$customHeader
Manage space
Manage content
Integrations