...
First, click Form Templates from the menu.


...
1. When you're ready to create your evaluation template, click Add located in the top right corner to begin. A new page will load and you can begin to create your evaluation template. Give your template a name in the Template Name field.
The Template Description field is optional.

Click Update Click Add to begin; a new page appears. Do the following:
a. In the Template Name box, enter the name of your new template.
b. (Optional) In the Template Description box, enter what this template is for.

c. Click Update to continue.
...
2. Now you can move on to adding question categories - simply click Add Category. Options for adding categories appear. Click Add Category to add new categories.
Categories are used to describe the types of question you will ask in the evaluation. Categories help present questions in an organized fashion.
| Info | ||
|---|---|---|
| ||
For more information about Categories, see Evaluation Categories. |

...
Category Descriptions
3. You'll now see two description fields: Description and Public Description. Both are optional. These are used to provide more detail on the category you're adding.
- Description is solely for the use of the person creating the template. It's never exposed to the evaluator (the person doing the evaluations)
- Public Description will be shown to the evaluator. To use this feature, simply enter content into the Public Description field. Anything entered therein will be "exposed" to the evaluator; if the field is left blank, no description will appear.
| Info |
|---|
One good use of the description field would be to describe which type of interaction this evaluation is to be used for. |

Choosing a Category Type
4. The next thing you need to do when creating your template is to decide which category this question will belong to. For a more detailed description of what a Category is, please see the Evaluation Category page.
As of now, this The next step is to add descriptions to your category. After clicking Add Template (see Step 2), a new page appears to allow you to configure your new category. The first three boxes are for describing the category. Do the following:
a. In the Category box, enter a name for this category.
b. In the Description box, enter what the category is for. Only the person creating the template will see this description, never the evaluator.
c. In the Public Description box, enter information that will help the evaluator understand what the category is for.

...
Category Types
4. The next step is to determine the category to which the question belongs.
For this example, the category is in position one, but you can change the position later (see Step 5). From here you will fill out the appropriate fields depending on which type of question you would like this category to be.
There are four different question types that you can be used for assign to the evaluation category: Yes/No, Scale, Single Choice, and Multi-Choice. Please see Click the following pages for detailed descriptions of each question typelinks for more information about how to configure each of the different types.
 Click Update when done configuring the category type.

...
Make Your Template Ready For Use
...
or for Calibration
...
5. Once you 've have added all of the categories that you 'd would like your agents to be evaluated on, and you're satisfied with the template , it may look something like this: might look as shown in the image below.
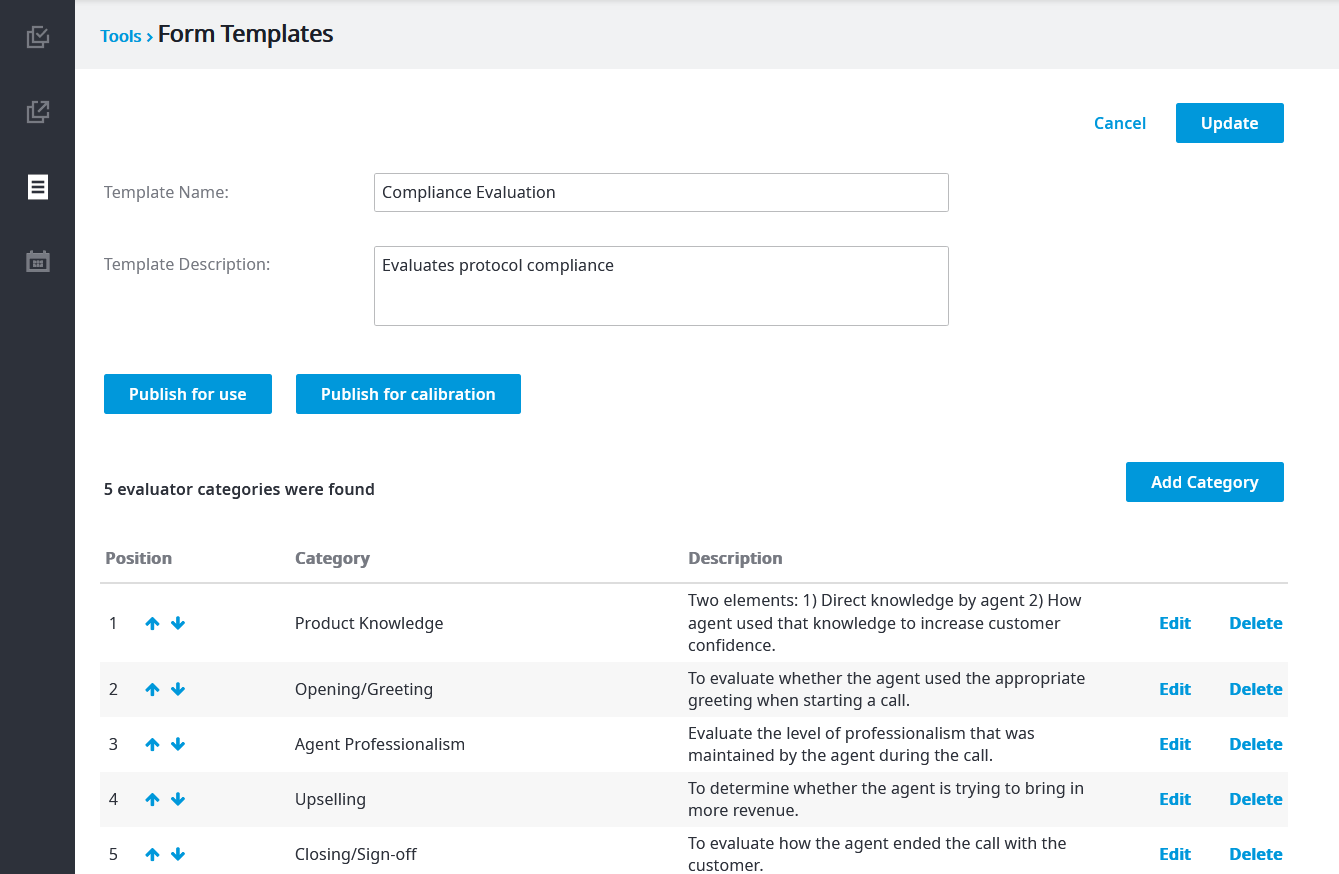
If you are ready for this template to be used in agent evaluations, click Publish for use.
Alternatively, you can instead click Publish for Calibrationcalibration. Let's spend a moment covering this option and the concept behind it.
- Calibration is an alternative mode of publishing. It's designed to help you review and test evaluation templates in preparation for publishing.
- Once a template is set to Calibration mode, it cannot be changed. However, you can clone the template and then click Publish for Use. You can also delete your calibration template as a point of housekeeping.
- When your template is in calibration mode, you can select a recording to evaluate , and the agent will not be notified of your evaluation.
- Reporting takes Calibration into account. Scores from calibration templates will be filtered out of your reports.
...
| Info |
|---|
Calibration is an alternative mode of publishing. Once a template is in Calibration mode, it cannot be changed. If you're happy with a template and wish to publish it, clone the template and then choose Publish for Use. |

To use calibration mode, fill in Template Name and Template Description and click Update. Next, add at least one Category. See our Evaluation Category page if you'd like more detail on this topic. Finally, click Publish for Calibration instead of Publish for Use.
...
You will then be 6. After clicking either Publish for use or Publish for calibration, you are redirected to the Form Templates screen, where you'll see your template has been added to the list of available evaluation templates. It will show one of two statuses: either Ready for use or Ready for Use (calibration), depending on the button you clicked.


Here's the same template in Calibration mode.


...
Related articles
...